
The control starts up in Incremental jog mode. In order to jog the axes in continuous movement, you need to press the INCR/CONT key to switch from incremental to continuous jog mode.
The Machine Home position is fully X- (table right), Y+ (saddle out) and Z+ (head up). The rotary table does not move: home is wherever it sits when you home the rest of the machine.
|
The control starts up in Incremental jog mode. In order to jog the axes in continuous movement, you need to press the INCR/CONT key to switch from incremental to continuous jog mode. |
 The work light
will come on automatically when the machine is powered up.
The work light
will come on automatically when the machine is powered up.
You can turn the light off and on by pressing the work light key on the jog panel.

You can insert and remove tools by hand when needed, using the tool clamp and unclamp pushbuttons on the front of the head.
The machine has a hydraulically shifted two-speed gearbox.
Gear shifting may be done manually with jog panel keys, or automatically with M functions, either in a CNC program or at the MDI prompt.
M42 |
High range (900-6000 RPM) |
 | |
| M41 | Low range (25-899 RPM) |
 | |
| M40 | Neutral (free spindle) |
| M49 | Shift to best range for programmed RPM |
M41 and M42 are not ordinarily needed. In normal programmed operation, the M3 and M4 codes will automatically shift to the appropriate range for the requested RPM, through the M49 code.
You can control spindle rotation speed and direction manually with jog panel keys, or automatically with program codes.
The spindle must be in Auto mode in order to use programmed M and S codes. The spindle must be in Manual mode in order to use the jog panel keys.
 |
Switch between Auto and Manual control modes. |
In manual mode, you can control operation and direction with these keys:
 |
Select spindle forward (CW) |
 |
Select spindle reverse (CCW) |
 |
Start spindle |
 |
Stop spindle |
 |
Orient and latch spindle |
In Auto mode, you can control operation and direction with these codes:
| M3 S__ | Select appropriate gear range and start spindle forward (CW tool) |
| M4 S__ | Select appropriate gear range and start spindle reverse (CCW tool) |
| M5 | Stop spindle |
| Snnn | Set speed to nnn RPM |
| M19 | Orient and latch spindle |
In either mode, you can further control speed with these keys:
 |
Increase speed |
 |
Set speed to 100% of programmed speed (Auto mode) or to half of maximum speed (Manual mode) |
 |
Decrease speed |
The A axis can be used as an indexer, or as a full fourth axis. In indexing operation, it can optionally be clamped and unclamped using the M10 and M11 codes:
| M10 | Clamp the rotary table |
| M11 | Unclamp the rotary table |
If you clamp the table with M10, you must remember to unclamp it with M11 before trying to move to another position.
The table will automatically unclamp when the program cycle ends.
To perform an automatic tool change use the M6 code, either in a program or at the MDI prompt.
E.g.
M6 T9
will put away whatever tool is in the spindle and will load tool #9.
You can also change tools using the F7/ATC option on the Setup, Offset Library, and Tool Library screens. On those screens, press F7/ATC; enter the tool number you wish to load; and press CYCLE START.
There are 200 tool entries available in the control's Tool and Offset Libraries. There are 30 usable stations ("bins") available in the machine's tool drum. You can assign bin numbers, from 1 to 30, to any tools in the Tool Library (F1/Setup, F2/Tool, F2/Tool Lib.).
For example, if you specify that tool 52 is in bin 12, then when your program calls for T52, the machine will load the tool from bin 12.
You can assign more than one tool to a bin.
You cannot change the bin assignment for the tool that is presently in the spindle. If this is necessary, put it away first by using M6 with a different tool number. Once the tool is back in the drum you can change its bin assignment (and move it by hand). If you wish, you can manually remove the tool from the spindle before telling the control to put it away in the drum and load a new tool. This will leave the bin empty.
As the machine runs and changes tools, it will always put the old tool back away in the bin it came from. Once set, a tool's bin assignment should not change until you choose to change it.
In a program, you can pre-stage tools using the M107 code. This allows the tool changer to rotate to the next tool in the job while the preceding tool is still cutting. E.g.
M107 T21
will rotate to tool #21 while the current tool is working.
You can also save a little time by inserting an M17 code at the end of a tool's final cut, just before the tool change. M17 will shut off the spindle and coolant, then start the spindle orientation process.
For example, using both M17 and M107:
M6 T1
M107 T2
M3 S2000
G0 X-1 Y0 Z.1 G43 H1
G1 ...
...
G0 Z.1
M17
M6 T2
M107 T3
M3 S1400
G0 X0 Y-1 Z.1 G43 H2
G81 ...
...
... G80
M17
M6 T3
M3 S2500
G0 X0 Y0 Z.1 G43 H3
...
G49 M25
Intercon will include M17 automatically when it posts programs on the control. The above hints are useful when you are hand-writing G code programs or configuring offline CAD/CAM software.
 When no tool change is in progress, you can
manually jog the tool drum forward using the ATC operator
panel below the drum.
This is a convenient way to load and unload tools in the drum.
When no tool change is in progress, you can
manually jog the tool drum forward using the ATC operator
panel below the drum.
This is a convenient way to load and unload tools in the drum.
Manual magazine rotation is permitted even when a program cycle is running, as long as no tool change or pre-stage is in progress.
If you have jogged the drum to a new position, the control will automatically bring it back to the correct location when it begins the next tool change.
If the control needs to perform an automatic tool change, and you have the
drum access door open (e.g. to replace a tool) the program will pause and
prompt you to close the door.
In rare cases it may be necessary to operate the tool changer components manually. You can do this with the ATC operator panel below the tool drum.

There are no safety interlocks when using the ATC operator panel. Before executing a step, double-check the function number and verify that there will be no collisions.
In order to exchange tools between the changer arm and the transfer arm, the head must be at the tool change position (G30 position). This is a short distance below machine home.
To put the Z axis at the G30 position, press F3 for the MDI prompt and enter:
G91 G30 Z0
If an error occurs which causes a tool change to be cancelled before it can complete, the control will assume that the old tool is still in place and the new tool is still back in the drum.
You can use the ATC operator panel to either back out of the tool change (putting the new tool away, as the control expects) or to finish the tool change. If the error occurred after the 180° rotation of the transfer arm, it will generally be easier to finish the change.
If you choose to finish the tool change, leaving the new tool in the spindle and the old tool in the drum, then you should manually exchange the tools so they are back where the control expects them to be (where they were before the tool change began). Tools in the drum can simply be lifted out and set in place. Tools in the spindle can be changed with the manual Unclamp and Clamp buttons on the head.
Optionally, you can use the F2/ATC Reset key on the Tool Library screen to re-teach the control the current tool-drum position; the tool in the spindle; and the drum location where the tool in the spindle should be put away.
 If all of the tool changer components are in their parked-and-ready
positions, then the LED in the Aux11 key will be lit. You will see this
LED go out at the beginning of a tool change, as the transfer arm moves
down to pick up the new tool. The Aux11 LED will come back on when the
tool change has run to a successful completion: when the transfer arm
finally moves back up after returning the old tool to the drum.
If all of the tool changer components are in their parked-and-ready
positions, then the LED in the Aux11 key will be lit. You will see this
LED go out at the beginning of a tool change, as the transfer arm moves
down to pick up the new tool. The Aux11 LED will come back on when the
tool change has run to a successful completion: when the transfer arm
finally moves back up after returning the old tool to the drum.
If an error or fault occurs during a tool change, one or more of the components will be out of position, and the Aux11 LED will not light.
Use the ATC operator panel to return the components (changer arm, changer arm carriage, and transfer arm) to their parked positions. You should see the Aux11 LED light to indicate when everything is back in its ready position.
The following items should be done on a weekly basis:
The PLC program can report various error and fault conditions, in addition to those listed in the Centroid operator's manual.
You can use the PLC Diagnostic display on the console to view some of the Centroid PLC input, output and memory locations mentioned with these error and fault conditions. At the control's main screen, press Alt-I to activate the PLC Diagnostic display. Press Alt-I again to dismiss it.
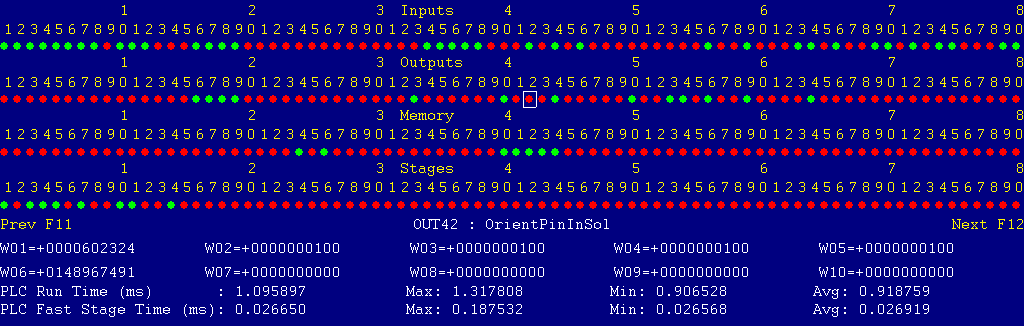
Each page of the Diagnostic display shows four rows of red and green dots: the first row shows PLC inputs 1 through 80; the second row PLC outputs 1 through 80; the third row PLC memory bits 1 through 80; and the fourth row PLC program stages 1 through 80.
You can use the arrow keys to move a highlight box over any of these locations. The name of the highlighted location will be displayed in the center of the screen below the red and green dots.
For example, in the illustration above the highlight box is on Output #42: The dot below the 2, to the right of the superscript 4, on the second line.
Below the four rows of bit status information are ten numeric ("word") variable values, labeled W1 through W10. Some of these variables also hold useful status information, described with the error and fault conditions to follow.
There are multiple pages of Diagnostic data. With the Alt-I diagnostic display showing, you can use the F12 and F11 keys to scroll right and left. For example, pressing F12 once will shift to the page showing inputs and outputs 81 through 160, and word variables W11 through W20.
Most fault conditions must be cleared by pressing the Emergency Stop button. Fault conditions have 9000-series message numbers.
Non-fault Error conditions generally cancel the program cycle and stop the spindle and coolant, but do not then need to be explicitly reset. Non-fault Error conditions have 8000-series message numbers.
Warnings and informational messages have 5000-series and 2000-series message numbers. They do not cancel the cycle or require any action to reset.
If any type of error occurs during a tool change sequence, the PLC will encode the state of 21 different inputs and flags, as they were at the moment of the error, in variable W8.
If you encounter an ATC error and the cause it not immediately obvious, press Alt-i to view the PLC Diagnostic display, and write down the value shown for W08. This will help Tech Support identify the source of the problem.
During a jogging move either the MP7 spindle probe or the MP4 table probe was tripped. The machine stops in order to prevent damage to the probe.
 The MP4 table probe may be prone to false trips from X and Y axis movement.
If this is a persistent problem, use the Aux2 key to disable the table probe
when you are not using it.
The MP4 table probe may be prone to false trips from X and Y axis movement.
If this is a persistent problem, use the Aux2 key to disable the table probe
when you are not using it.
A tool change was requested, but the specified tool was not in one of the recognized bin numbers (1 - 30). Check the bin numbers listed in the Tool Library (F1/Setup, F2/Tool, F2/Tools).
During an automatic tool change or pre-stage, the tool drum failed to unlock within the allowed time.
References:
PLC OUT45:	indicates SOL2 state: Green = 1 = unlock tool drum (retract shotpin)
PLC INP63:	indicates PRS1 state: Green = 1 = shotpin in; Red = 0 = shotpin out
Schematic:	Lines 105, 157
During an automatic tool change or pre-stage, the tool drum failed to reach the desired position within the allowed time.
This may be because the drum is not rotating at all, due to a hydraulic failure or physical jam; or it may be because the tool counter sensor PRS4 is not changing to show the PLC that the drum is rotating.
References:
PLC OUT46:	indicates SOL4A state: Green = 1 = rotate drum CW
PLC OUT47:	indicates SOL4B state: Green = 1 = rotate drum CCW
PLC INP64:	indicates PRS4 state: Green = 1 = at a tool position; Red = 0 = between positions
Schematic:	Lines 105, 158, 159
At the start of an automatic tool change, the tool drum could not rotate to the new tool position within the allowed time.
References:
PLC W8: contains state of multiple ATC inputs and flags at the time of the error
During an automatic tool change, the tool transfer arm failed to move down onto the new tool within the allowed time.
This may be because the arm indeed failed to move all the way down due to a hydraulic failure or physical jam; or it may be because the arm-down sensor PRS56 did not close to indicate that the arm was down.
References:
PLC OUT51:	indicates SOL56 state: Green = 1 = move transfer arm down
PLC INP67:	indicates PRS56 state: Green = 1 = transfer arm down; Red = 0 = not down
PLC W8:  	contains state of multiple ATC inputs and flags at the time of the error
Schematic:	Lines 108, 171
During an automatic tool change, one of several conditions failed to be met within the allowed time.
This may be because the arm indeed failed to move in due to a hydraulic failure or physical jam; because the changer arm carriage failed to move down due to a hydraulic failure or obstruction; or the spindle failed to orient due to misalignment of the spindle encoder or hydraulic failure of the lockpin cylinder. It may be also be because of a failure of one or more of the sensors which indicate the positions of those devices.
References:
PLC OUT42:	indicates SOL22 state: Green = 1 = extend spindle orient lockpin
PLC OUT52:	indicates SOL57 state: Green = 1 = swing transfer arm to head
PLC OUT55:	indicates SOL97 state: Green = 1 = move TCA carriage down
PLC INP41:	indicates PRS22 state: Green = 1 = orient lockpin extended; Red = 0 = not extended
PLC INP68:	indicates PRS57 state: Green = 1 = transfer arm to head; Red = 0 = not at head
PLC INP71:	indicates PRS97 state: Green = 1 = TCA carriage down; Red = 0 = not down
PLC W8:  	contains state of multiple ATC inputs and flags at the time of the error
Schematic:	Lines 86, 109, 110, 154, 172, 175
During an automatic tool change, the changer arm failed to swing from its parked position to the tool-gripping position within the allowed time.
This may be because the arm indeed failed to swing due to a hydraulic failure or physical jam; or it may be because neither of the interchange-position sensors PRS62A and PRS62B closed to indicate the arm had reached the gripping position.
References:
PLC OUT58:	indicates SOL62 state: Green = 1 = rotate arm CW to interchange position
PLC INP76:	indicates PRS62A state: Green = 1 = arm at INT1; Red = 0 = not at INT1
PLC INP77:	indicates PRS62B state: Green = 1 = arm at INT2; Red = 0 = not at INT2
PLC W8:  	contains state of multiple ATC inputs and flags at the time of the error
Schematic:	Lines 113, 178
During an automatic tool change, the drawbar failed to unclamp the tool from the spindle within the allowed time.
This may be due to a hydraulic failure, or may be because sensor PRS77 is faulty or out of position.
References:
PLC OUT43:	indicates SOL77 state: Green = 1 = unclamp drawbar
PLC INP43:	indicates PRS77 state: Green = 1 = tool unclamped; Red = 0 = not unclamped
PLC W8:  	contains state of multiple ATC inputs and flags at the time of the error
Schematic:	Lines 87, 155
During an automatic tool change, the changer arm failed to move down to remove the tools from the spindle and transfer arm, prior to exchanging tools.
References:
PLC OUT57:	indicates SOL9 state: Green = 1 = move changer arm down
PLC INP73:	indicates PRS9 state: Green = 1 = changer arm down; Red = 0 = not down
PLC W8:  	contains state of multiple ATC inputs and flags at the time of the error
Schematic:	Lines 111, 176
During an automatic tool change, at the beginning of the 180° rotation of the changer arm, sensor PRS29 did not open to signal that the 180° plunger could be re-extended.
References:
PLC OUT60:	indicates SOL27 state: Green = 1 = retract 180° plunger
PLC INP78:	indicates PRS29 state: Green = 1 = retract plunger; Red = 0 = extend plunger
PLC W8:  	contains state of multiple ATC inputs and flags at the time of the error
Schematic:	Lines 114, 180
During an automatic tool change, in the second half of the 180° rotation of the changer arm, sensor PRS62A or PRS62B failed to close, to indicate that the arm had completed its rotation.
References:
PLC OUT58:	indicates SOL62 state: Green = 1 = rotate arm CW to exchange tools
PLC INP76:	indicates PRS62A state: Green = 1 = arm at INT1; Red = 0 = not at INT1
PLC INP77:	indicates PRS62B state: Green = 1 = arm at INT2; Red = 0 = not at INT2
PLC W8:  	contains state of multiple ATC inputs and flags at the time of the error
Schematic:	Lines 113, 178
During an automatic tool change, the changer arm did not move back up, to insert the tools into the spindle and the transfer arm, within the allowed time.
References:
PLC OUT56:	indicates SOL10 state: Green = 1 = move changer arm up
PLC INP72:	indicates PRS10 state: Green = 1 = changer arm up; Red = 0 = not up
PLC W8:  	contains state of multiple ATC inputs and flags at the time of the error
Schematic:	Lines 111, 176
During an automatic tool change, sensor PRS76 did not close to indicate that the new tool was clamped in the spindle within the allowed time.
References:
PLC OUT43:	indicates SOL77 state: Green = 1 = unclamp drawbar
PLC INP44:	indicates PRS76 state: Green = 1 = tool clamped; Red = 0 = not clamped
PLC W8:  	contains state of multiple ATC inputs and flags at the time of the error
Schematic:	Lines 88, 155
During an automatic tool change, sensor PRS68 did not close to indicate that the changer arm had returned to its parked position within the allowed time.
References:
PLC OUT59:	indicates SOL68 state: Green = 1 = rotate changer arm CCW to park
PLC INP74:	indicates PRS68 state: Green = 1 = changer arm at parked position; Red = 0 = not parked
PLC W8:  	contains state of multiple ATC inputs and flags at the time of the error
Schematic:	Lines 112, 179
During an automatic tool change, the tool drum did not finish rotating back to the put-away position for the tool which was just removed from the spindle, within the allowed time.
References:
PLC MEM22:	indicates drum rotation in progress: Green = 1 = busy; Red = 0 = idle
PLC W26:	indicates current tool drum position (1 - 30)
PLC W8:  	contains state of multiple ATC inputs and flags at the time of the error
During an automatic tool change, sensor PRS58 did not close, to indicate that the transfer arm had completed its swing back to the tool drum, within the allowed time; or sensor PRS96 did not close to indicate that the changer arm carriage had returned up to its parked position.
References:
PLC OUT53:	indicates SOL58 state: Green = 1 = swing transfer arm to tool drum
PLC OUT54:	indicates SOL96 state: Green = 1 = move TCA carriage up
PLC INP69:	indicates PRS58 state: Green = 1 = transfer arm at drum; Red = 0 = not at drum
PLC INP70:	indicates PRS96 state: Green = 1 = TCA carriage up; Red = 0 = not up
PLC W8:  	contains state of multiple ATC inputs and flags at the time of the error
Schematic:	Lines 109, 110, 173, 174
During an automatic tool change, sensor PRS55 did not close, to indicate that the transfer arm had returned up to its parked position, within the allowed time.
References:
PLC OUT50:	indicates SOL55 state: Green = 1 = move transfer arm up
PLC INP66:	indicates PRS55 state: Green = 1 = transfer arm up; Red = 0 = not up
PLC W8:  	contains state of multiple ATC inputs and flags at the time of the error
Schematic:	Lines 108, 170
Upon completion of an automatic tool change, the M6 macro failed to acknowledge completion by removing its tool-change request within the allowed time.
References:
PLC W8: contains state of multiple ATC inputs and flags at the time of the error
The control attempted to start an automatic tool change, but sensor PRS76 was not closed to indicate that the drawbar was clamped. The drawbar must be clamped (closed) before a tool change can begin.
References:
PLC INP44:	indicates PRS76 state: Green = 1 = drawbar clamped; Red = 0 = not clamped
PLC W8:  	contains state of multiple ATC inputs and flags at the time of the error
Schematic:	Line 88
The control attempted to start an automatic tool change, but sensor PRS55 was not closed to indicate that the transfer arm was fully up in its parked position. The transfer arm must be up before a tool change can begin.
References:
PLC INP66:	indicates PRS55 state: Green = 1 = transfer arm up; Red = 0 = not up
PLC W8:  	contains state of multiple ATC inputs and flags at the time of the error
Schematic:	Line 108
The control attempted to start an automatic tool change, but sensor PRS58 was not closed to indicate that the transfer arm was swung back over the tool drum. The transfer arm must be back at the drum before a tool change can begin.
References:
PLC INP69:	indicates PRS58 state: Green = 1 = transfer arm at drum; Red = 0 = not at drum
PLC W8:  	contains state of multiple ATC inputs and flags at the time of the error
Schematic:	Line 109
The control attempted to start an automatic tool change, but sensor PRS96 was not closed to indicate that the changer arm carriage was fully up in its parked position. The changer arm carriage must be up before a tool change can begin.
References:
PLC INP70:	indicates PRS96 state: Green = 1 = TCA carriage up; Red = 0 = not up
PLC W8:  	contains state of multiple ATC inputs and flags at the time of the error
Schematic:	Line 110
The control attempted to start an automatic tool change, but sensor PRS10 was not closed to indicate that the tool changer arm was fully up in its parked position. The changer arm must be up before a tool change can begin.
References:
PLC INP72:	indicates PRS10 state: Green = 1 = changer arm up; Red = 0 = not up
PLC W8:  	contains state of multiple ATC inputs and flags at the time of the error
Schematic:	Line 111
The control attempted to start an automatic tool change, but sensor PRS29 was not open. This indicates either that the changer arm is out of position, or that there is a problem with the sensor. PRS29 tells the control when to retract and extend the 180° rotation plunger during tool exchange. It should be open when the arm is at the park position, ready to begin a tool change sequence.
References:
PLC INP78:	indicates PRS29 state: Green = 1 = retract plunger; Red = 0 = extend plunger
PLC W8:  	contains state of multiple ATC inputs and flags at the time of the error
Schematic:	Line 114
The control attempted to start an automatic tool change, but sensor PRS68 was not closed to indicate that the tool changer arm was in its fully-parked position. The changer arm must be parked before a tool change can begin.
References:
PLC INP74:	indicates PRS68 state: Green = 1 = changer arm at parked position; Red = 0 = not parked
PLC W8:  	contains state of multiple ATC inputs and flags at the time of the error
Schematic:	Line 112
You attempted to start the spindle, orient the spindle, or shift headstock gear ranges, but sensor PRS76 is not closed to indicate that the drawbar is clamped.
References:
PLC INP44:	indicates PRS76 state: Green = 1 = tool clamped; Red = 0 = not clamped
Schematic:	Line 88
You attempted to start the spindle, but sensor PRS68 is not closed to indicate that the tool changer arm is in its fully-parked position. Spindle rotation is prohibited when the arm is not parked, in order to prevent damage to the tool change arm grippers.
References:
PLC INP74:	indicates PRS68 state: Green = 1 = changer arm at parked position; Red = 0 = not parked
Schematic:	Line 112
You attempted to start the spindle, but sensor PRS23 is not closed to indicate that the orient shotpin is retracted.
Check orient pin function and sensor position.
References:
PLC INP41:	indicates PRS22 state: Green = 1 = orient pin extended
PLC INP42:	indicates PRS23 state: Green = 1 = orient pin retracted
Schematic:	Lines 86, 87
The MPU11 motion controller detected loss of fiber optic communication from the GPIO4D interface unit.
Check the optical fibers. Verify that they have not been bent, kinked, or pulled loose from their sockets. Verify that they are both plugged into the correct sockets (1 to 1 and 3 to 3, on both boards).
The GPIO4D interface unit reported back to the MPU11 motion controller a loss of fiber optic communication from the MPU11. This indicates that Fiber 3 is functioning normally, but Fiber 1 may have problems.
Check the optical fibers. Verify that they have not been bent, kinked, or pulled loose from their sockets. Verify that they are both plugged into the correct sockets (1 to 1 and 3 to 3, on both boards).

One of the Siemens servo motors has tripped its overload relay.
Check possible causes for an axis overload. Press the reset button on the affected overload relay, on the magnetics panel below the servo drives, then press and release Emergency Stop to clear the fault.
References:
PLC INP17:	indicates OL6 (X) state: Green = 1 = okay; Red = 0 = overload
PLC INP18:	indicates OL7 (Y) state: Green = 1 = okay; Red = 0 = overload
PLC INP19:	indicates OL8 (Z) state: Green = 1 = okay; Red = 0 = overload
Schematic:	Lines 13, 17, 20, 62, 64, 66
The Centroid DC Single drive controlling the rotary table is reporting a fault condition, or has shut down.
Check logic power (5VDC and 12VDC) to the DC Single drive, and check the optical fibers between the MPU11 board and the DC Single.
Press and release Emergency Stop to clear the fault.
References:
PLC INP16:	indicates CON1 state: Green = 1 = closed (okay); Red = 0 = open (fault)
Schematic:	Lines 44, 58, 80
The Fanuc spindle drive unit is reporting a fault condition.
Check the LED display on the spindle drive itself for a fault code.
Press and release Emergency Stop to clear the fault.
References:
PLC INP7:	indicates spindle drive state: Green = 1 = okay; Red = 0 = fault
Schematic:	Lines 6, 76
The MPU11 board is not receiving communication from the jog panel in the console.
Check the jog panel cable connection at the MPU11 board and inside the back of the console.
Press and release Emergency Stop to clear the fault.
The jog panel reports that it is not receiving communications from the MPU11 board.
Check the jog panel cable connection at the MPU11 board and inside the back of the console.
Press and release Emergency Stop to clear the fault.
You attempted to start the spindle running with the Renishaw MP7 spindle probe in place.
Remove the probe from the spindle.
Press and release Emergency Stop to clear the fault.
The way lube tank is low on oil, or there is not sufficient air pressure to operate the lube pump.
Check lube level and air supply pressure, then press and release Emergency Stop to clear the fault.
References:
PLC INP34:	combined FS1 and PS2 states: Green = 1 = okay; Red = 0 = low level or low pressure
Schematic:	Line 83
You exited the CNC11 control software without first pressing Emergency Stop.
Press and release Emergency Stop to clear the fault.
The hydraulic pump was running, but pressure switch PS4 was not closed to indicate adequate hydraulic pressure.
Investigate possible causes. Press and release Emergency Stop to clear the fault.
References:
PLC INP38:  	indicates PS4 state: Green = 1 = closed = pressure up; Red = 0 = low/no pressure
Schematic:	Line 85

The hydraulic pump has tripped the overload on its starter (OL1).
Investigate possible causes for the overloaded motor.
Press the reset button on the overload unit, then press and release Emergency Stop to clear the fault.
References:
PLC INP13:  	indicates OL1 state: Green = 1 = tripped; Red = 0 = okay
Schematic:	Line 25, 79

The coolant pump has tripped the overload on its starter (OL3).
Investigate possible causes for the overloaded motor.
Press the reset button on the overload unit, then press and release Emergency Stop to clear the fault.
References:
PLC INP14:  	indicates OL3 state: Green = 1 = tripped; Red = 0 = okay
Schematic:	Line 26, 79
The hydraulic pump is running, but pressure switch PS3 has not closed to indicate adequate pressure for spindle lubrication.
Check possible causes, then press and release Emergency Stop to clear the fault.
References:
PLC INP35:  	indicates PS3 state: Green = 1 = pressure okay; Red = 0 = pressure low
Schematic:	Line 83
One of the PLCADD1616 expansion boards has failed to communicate properly with the GPIO4D board.
Check the gray PLC expansion cables that connect the offending PLCADD1616 board to the headers near the right edge of the GPIO4D board. Check for green 5V power and "PLC OK" LED indicators on the PLCADD1616 board.
During a tool change or M19 operation, the spindle orient pin failed to drop in within the expected time. This may be due to a hydraulic problem, or a change in spindle encoder alignment.
References:
PLC OUT42:  	indicates SOL22 state: Green = 1 = extend orient pin to lock spindle
PLC INP41:  	indicates PRS22 state: Green = 1 = orient pin in (locking spindle)
PLC INP42:  	indicates PRS23 state: Green = 1 = orient pin out (free spindle)
PLC W17:        current spindle encoder count, away from index
Machine Parameter 930:  expected spindle encoder position when oriented
Schematic:	Lines 2, 86, 87, 154, 167
During a gear shift to high range, the PLC waited for the spindle to stop, but the spindle did not stop within the allowed time limit.
References:
PLC INP8:    	zero-speed signal from spindle drive: Green = 1 = stopped
Schematic:	Line 76
During a gear shift to high range, the headstock failed to fully shift within the allowed time limit.
References:
PLC INP46:    	indicates PRS24 state: Green = 1 = in high gear
Schematic:	Line 89
During a gear shift to high range, the PLC waited for the spindle to stop, but the spindle did not stop within the allowed time limit.
References:
PLC INP8:    	zero-speed signal from spindle drive: Green = 1 = stopped
Schematic:	Line 76
During a gear shift to low range, the headstock failed to fully shift within the allowed time limit.
References:
PLC INP48:    	indicates PRS25 state: Green = 1 = in low gear
Schematic:	Line 90
The PLC program can also generate the following non-error messages, in addition to those listed in the Centroid operator's manual.
A previous PLC fiber communication fault (9022 or 9023) has been fixed and cleared.
You pressed a keyboard shortcut key for jogging the machine or starting a cycle, but those shortcuts have been disabled on this control.
A previous fault condition has been cleared by pressing Emergency Stop.
The PLC program requested display of an error message, but provided an invalid message code. Notify your dealer.
References:
PLC W16: message code number which caused the problem
ATC drum rotation was requested, but the access door on the tool drum is open. Close the door.
References:
PLC INP75:	indicates PRS48 state: Green = 1 = door closed; Red = 0 = door open
Schematic:	Line 112
Pressure switch PS1 has opened, indicating that the hydraulic oil filter is clogged.
Replace the filter as soon as possible.
References:
PLC INP36:	indicates PS1 state: Green = 1 = okay; Red = 0 = filter clogged
Schematic:	Line 84
The console arm is in a position where the table guards could potentially hit the console, and the X and Y axes are moving into the console arc.
Swing the console out in front of the machine, then press CYCLE START to resume movement.
Sensor PRS87 is located below the console arm pivot, and senses a cam which closes the sensor when the console is clear of any possible interference.
 When PRS87 is closed, the LED in the Aux12 key will light to show
that the console is clear of possible interference.
When PRS87 is closed, the LED in the Aux12 key will light to show
that the console is clear of possible interference.
References:
PLC INP80:	indicates PRS87 state: Green = 1 = okay; Red = 0 = interference possible
Schematic:	Line 115

The CNC program is attempting to start the spindle shortly after an automatic tool change, but there is no tool detected in the spindle. The program pauses until you either press CYCLE START to proceed, or you press CYCLE CANCEL to end the program.
This is to protect against damage in case the tool change sequence somehow missed or dropped the new tool. If it is your intent to run without a tool (e.g. in a dry run) then just press CYCLE START.
If this message appears as a false alarm (if there really is a tool in the spindle) then check the position of the rings and sensors at the top of the drawbar. The topmost sensor is PRS21. It should only close (sense) when the drawbar is higher than the normal tool-clamped position: a position it should only be able to reach if there is no tool present.
References:
PLC INP45:	indicates PRS21 state: Green = 1 = tool missing; Red = 0 = tool present
Schematic:	Line 88
You tried to start a program cycle, but the hydraulic pump is not running.
Press the HYDR ON key to start the hydraulic pump, then try the cycle again.
Confirms that you started up the hydraulic system.
28-May-2014 MBL
![]()